
Tutorials
Set up your business
Once our team gives you access, you open the business area, create your business, and complete the 4 guided steps (card, location, profile, and public page). Ready to stamp.
This guide follows a new owner all the way from opening the app for the first time to getting your public page live. The premise: our team has already activated your account, so when you enter the business area you land on a welcome, not a paywall.
Watch the videoOn video
Watch the full walkthrough on video
Prefer to watch before following the steps? This video walks the whole process from start to finish (narrated in Spanish); the step-by-step below mirrors it in English with the same screens.
Before you start
Three things worth understanding before you follow the steps.
How access works
This guide shows the happy path: our team already activated your account, so you see a welcome instead of a charge. To get there, you first create an account and ask us to activate it:
- Download the app and create your account with Apple, Google, or your email; if you already have one, just log in.
- In your profile, use the copy button next to your email and send us that email on WhatsApp.
- Once we confirm your account is active, you enter the business area and see the welcome. If you did not have access yet, the subscription screen would appear: that is a valid path, not an error.
When you can start stamping
The moment your card exists: as soon as you tap "Guardar tarjeta" (save card) once and it stops saying "Borrador" (draft). A saved, active card is the only requirement to stamp. Your location, profile, and public page make your business look complete, but none of them are required to give a stamp.
The stamp-count rule
Pick your stamp count carefully before you share your card, because a later change does not affect everyone the same way.
- The number of stamps to complete the card: if you change it later, it only applies to new cards.
- The color, icon, logo, and reward: update on every card right away.
- Anyone already collecting: keeps the stamp count they started with until they finish that card.
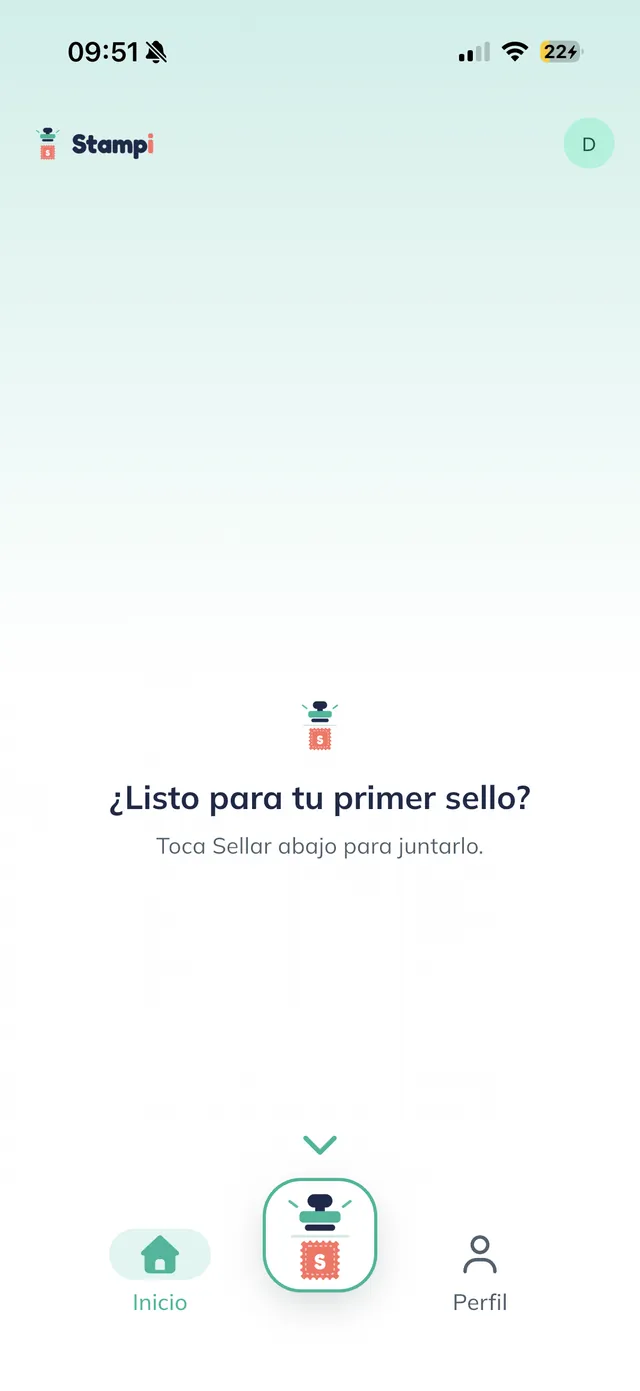
Start on your home screen
After creating your account you land on the customer home, "¿Listo para tu primer sello?" (ready for your first stamp?). This is the personal side of Stampi; your business area is one tap away in your profile. Start here.
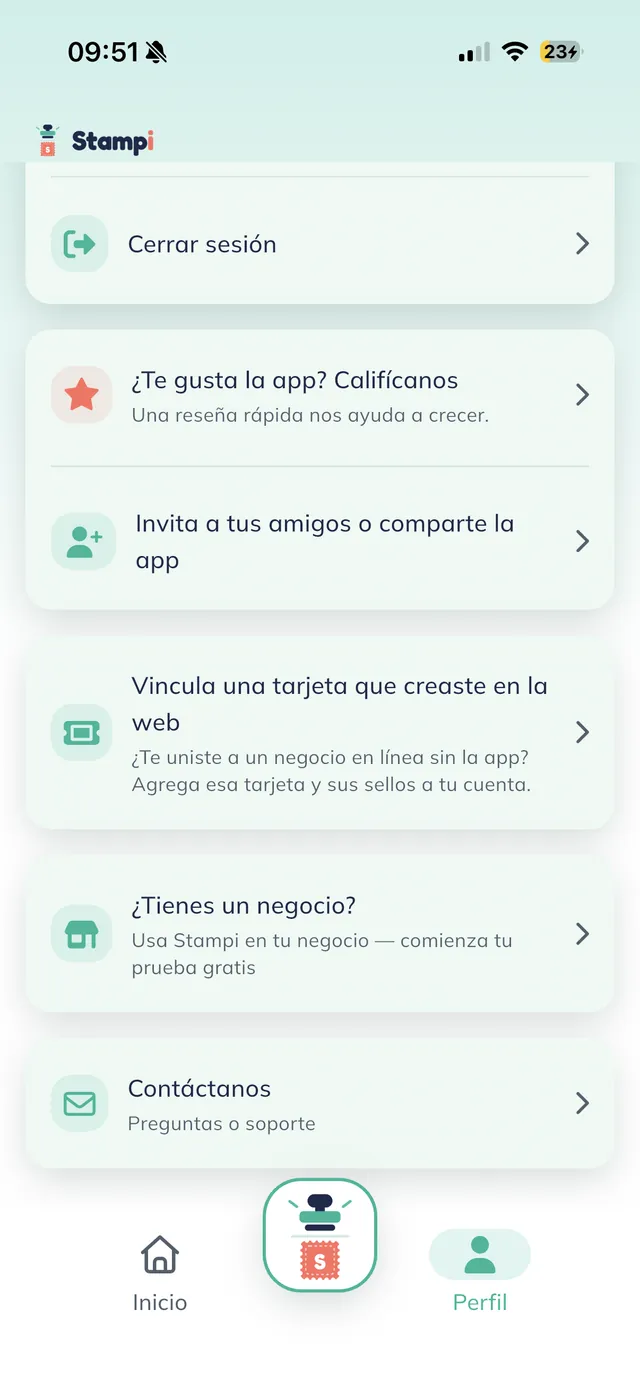
Go in through your profile
Tap "Perfil" (profile) and scroll down. Among the profile rows, tap "¿Tienes un negocio? · Usa Stampi en tu negocio — comienza tu prueba gratis" (do you have a business? use Stampi at your shop, start your free trial). That row only shows if your account is still a pure customer; if you are already an owner or on a team, you reach your business through the profile business switcher instead.
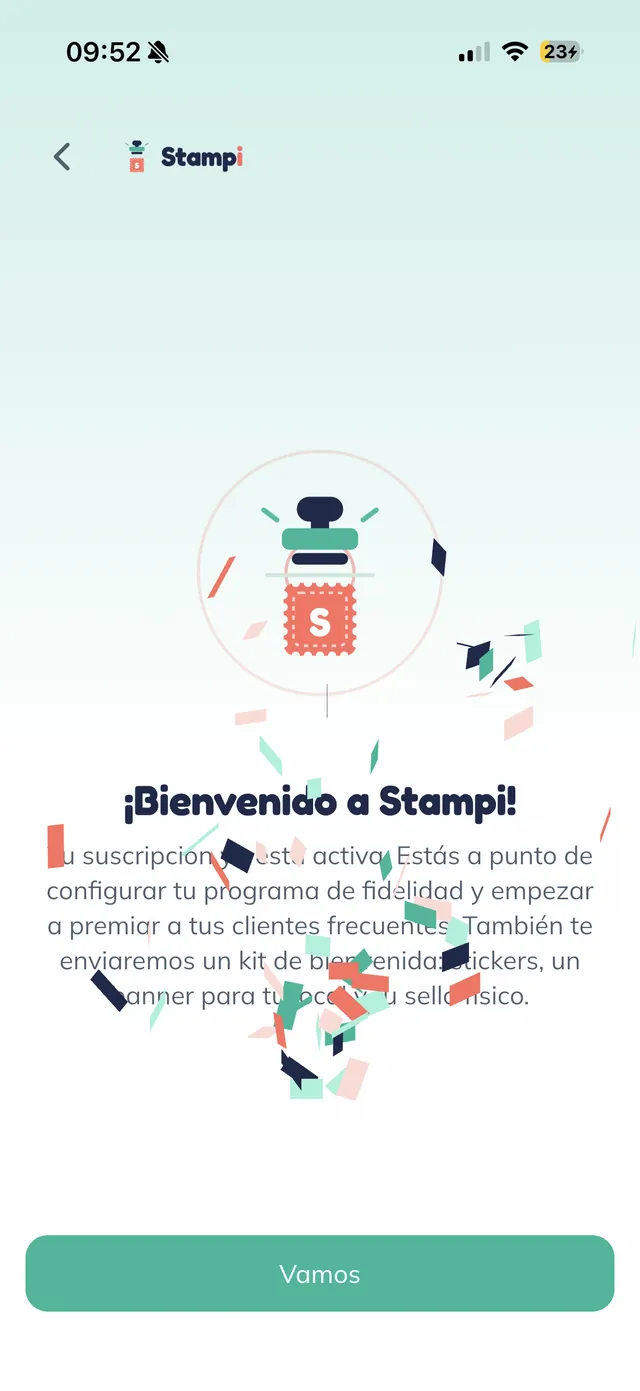
Get your welcome
"¡Bienvenido a Stampi!" (welcome to Stampi) appears with confetti and a message that your subscription is active and that we will send a welcome kit with stickers, a banner, and your physical stamp. Tap "Vamos" (let us go).
Note: You see the welcome, not a paywall, because you shared your account email and our team activated it. If you did not have access, the subscription screen would appear here so you could pay on the spot. That is a valid path, not an error; message us and we will enable it.
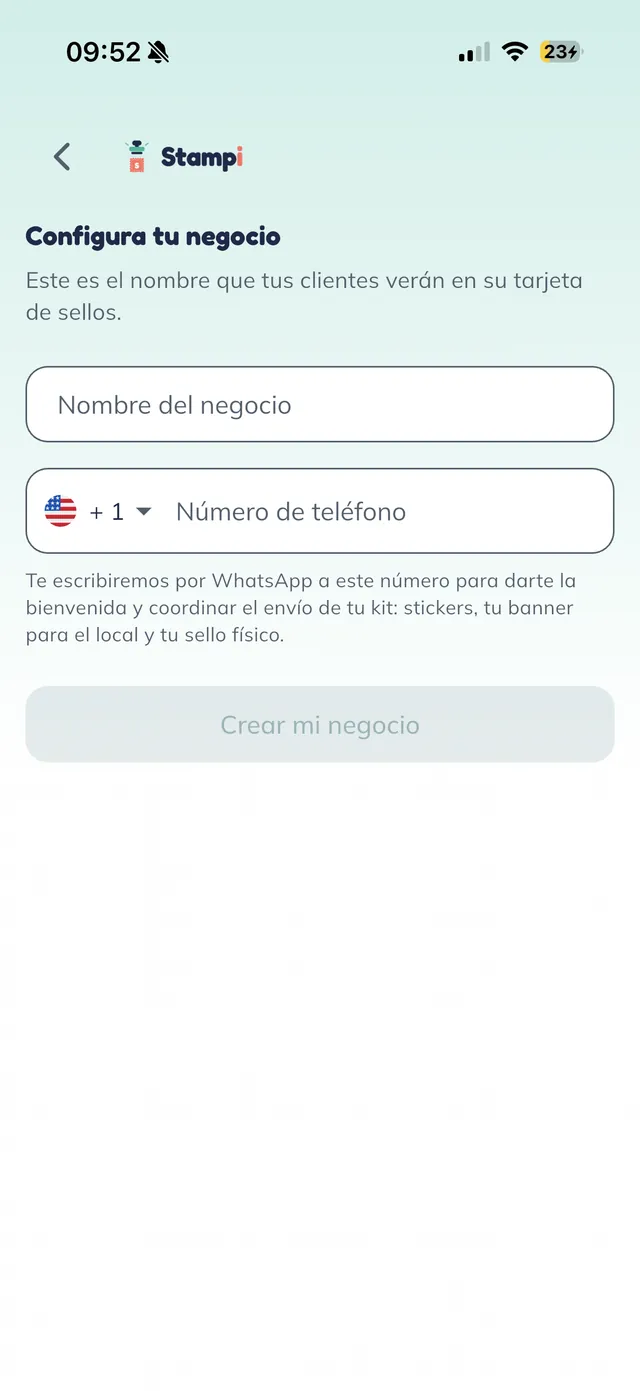
Open your business form
"Configura tu negocio" (set up your business) opens with the subtitle "Este es el nombre que tus clientes verán en su tarjeta de sellos" (this is the name your customers will see on their stamp card). Fill two required fields: "Nombre del negocio" (business name) and "Número de teléfono" (phone number). We will message that number on WhatsApp to welcome you and arrange your kit. The "Crear mi negocio" (create my business) button stays disabled until both fields are valid.
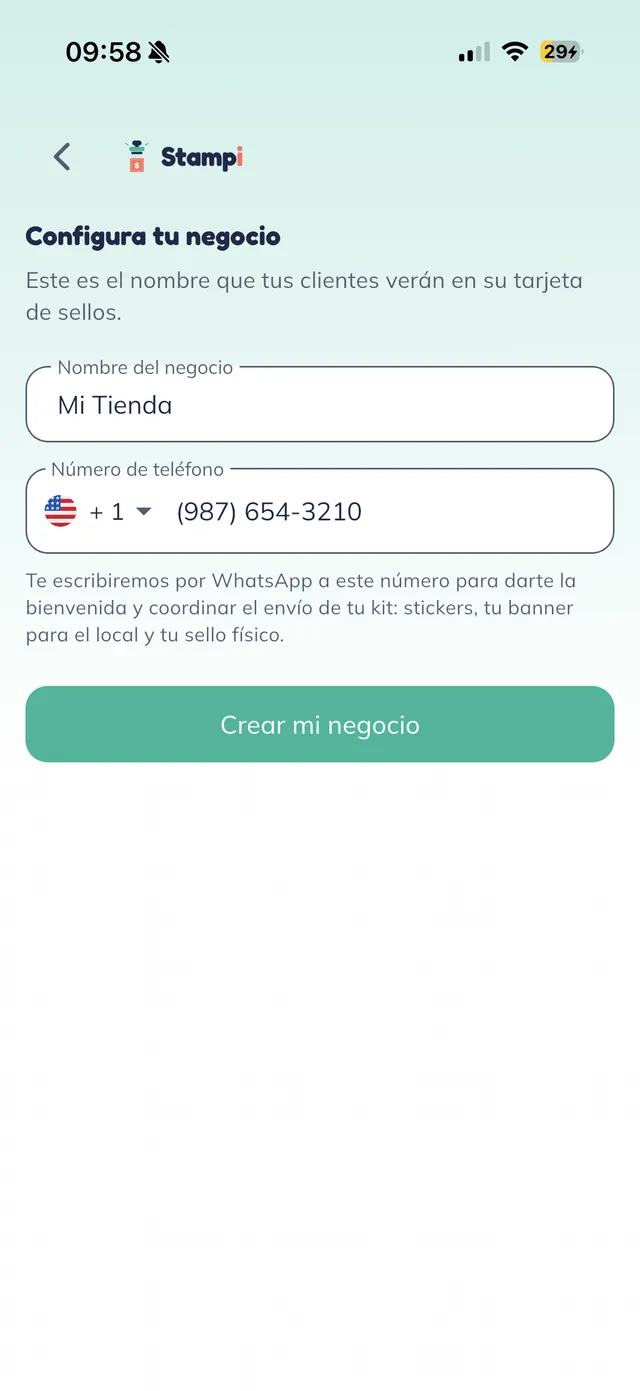
Create your business
With the name and WhatsApp filled in, tap "Crear mi negocio" (create my business). In one step this creates your business account, your first shop, and your owner role, and drops you on your "Mostrador" (counter), your business home. It is safe to tap again: if you already have a business, you get it back instead of a duplicate.
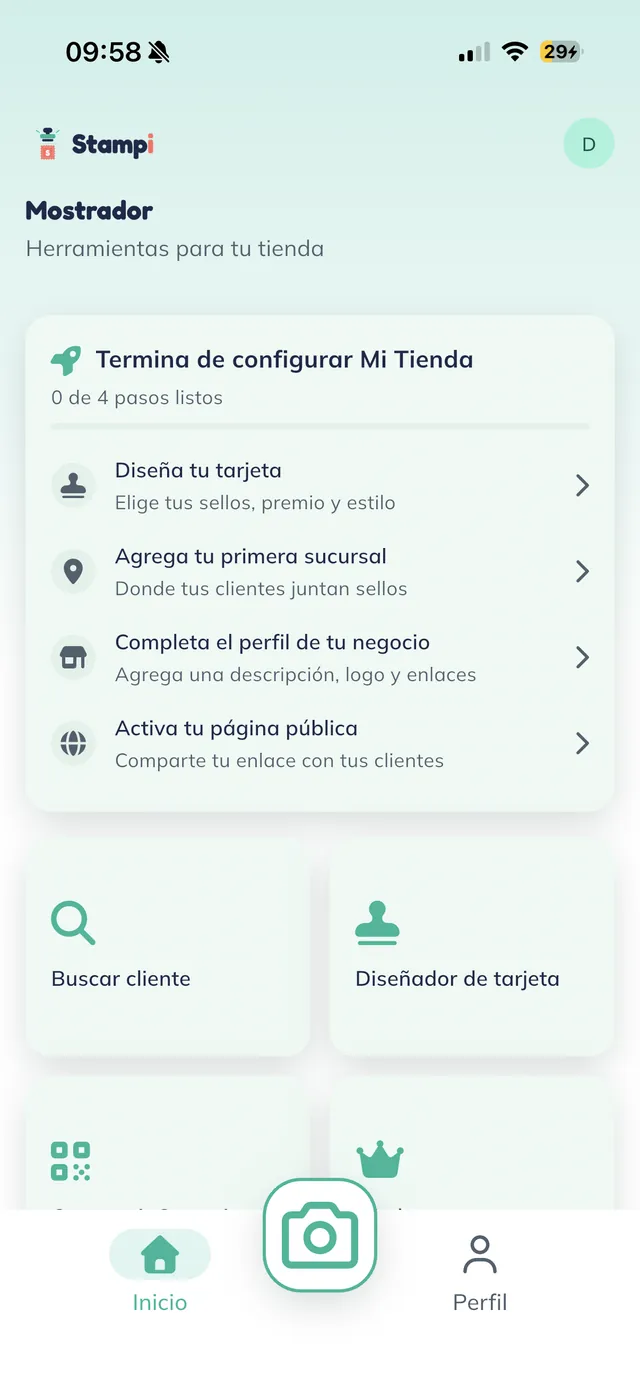
Meet your setup checklist
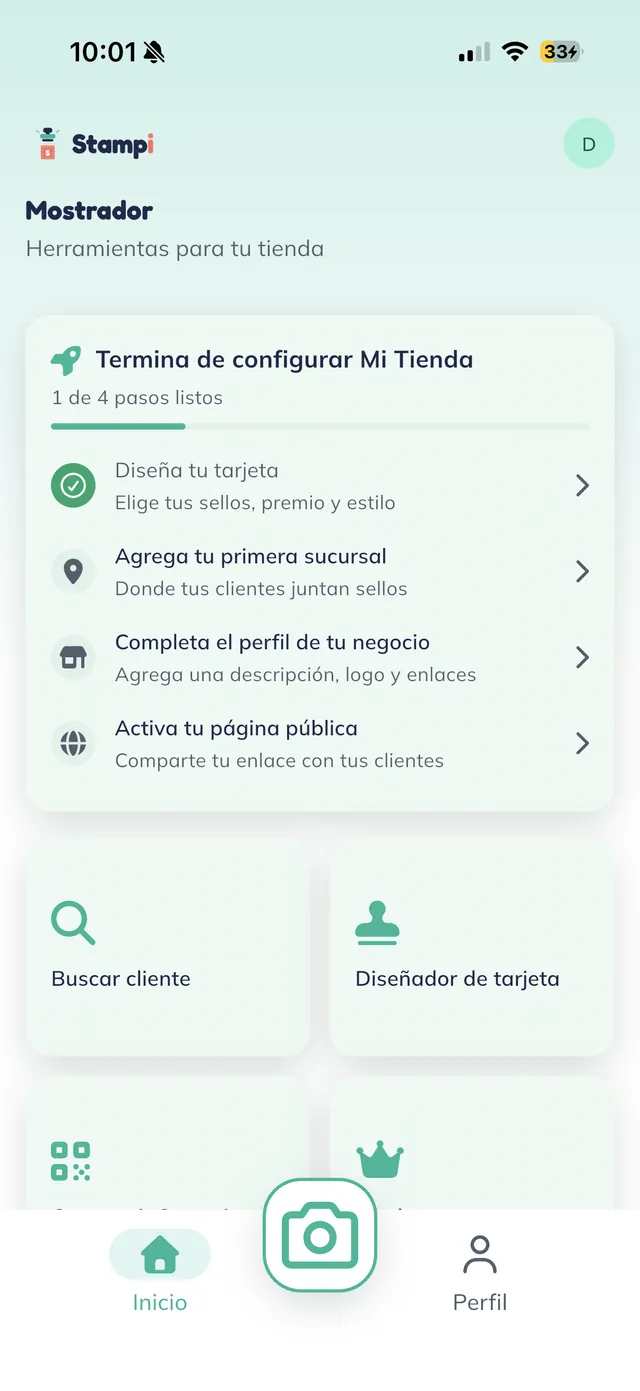
This is your "Mostrador" (counter), your business home. At the top sits "Termina de configurar Mi Tienda · 0 de 4 pasos listos" (finish setting up My Shop, 0 of 4 steps done). Tap each of its four rows to complete it; the next screens walk them in order:
- "Diseña tu tarjeta" (design your card) — choose your stamps, reward, and style.
- "Agrega tu primera sucursal" (add your first location) — where your customers collect stamps.
- "Completa el perfil de tu negocio" (complete your business profile) — add a description, logo, and links.
- "Activa tu página pública" (activate your public page) — share your link with your customers.
Note: The checklist ticks itself from your data, so you can see what is missing:
- The first two steps are required: the card ticks when a card exists and the location ticks when a location exists.
- The profile and public page are optional: they tick when you fill in real data or simply visit the screen.
- If you delete your only card or location, that step un-ticks and the checklist comes back.
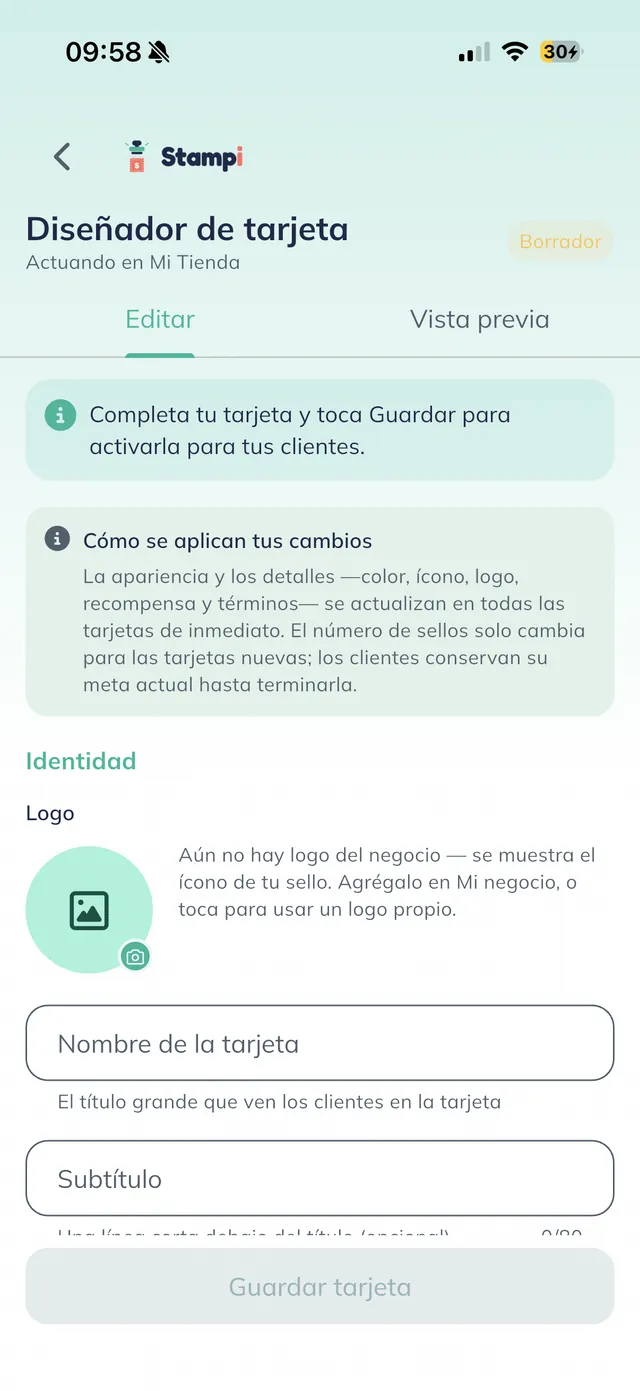
Open the card designer
The "Diseñador de tarjeta" (card designer) opens with the "Editar" (edit) and "Vista previa" (preview) tabs and a "Borrador" (draft) badge: the card is not active yet. Up top it reads "Completa tu tarjeta y toca Guardar para activarla para tus clientes" (finish your card and tap Save to activate it for your customers). Then the "Identidad" (identity) section starts with the "Logo"; if you have not uploaded one, your stamp icon shows instead.
Warning: Changing the number of stamps only affects new cards. So pick your stamp count carefully before you share your card.
- Appearance and details (color, icon, logo, reward, and terms) update on every card right away.
- The number of stamps changes only for cards started after the edit.
- Anyone already collecting finishes with the stamp count their card had at the start.
Note: The card logo is a tri-state; the simplest approach is to upload one logo in "Mi negocio" (my business) and let every card inherit it:
- Inherit your business logo (the default).
- Use its own logo you upload here.
- Show none and fall back to the stamp icon.
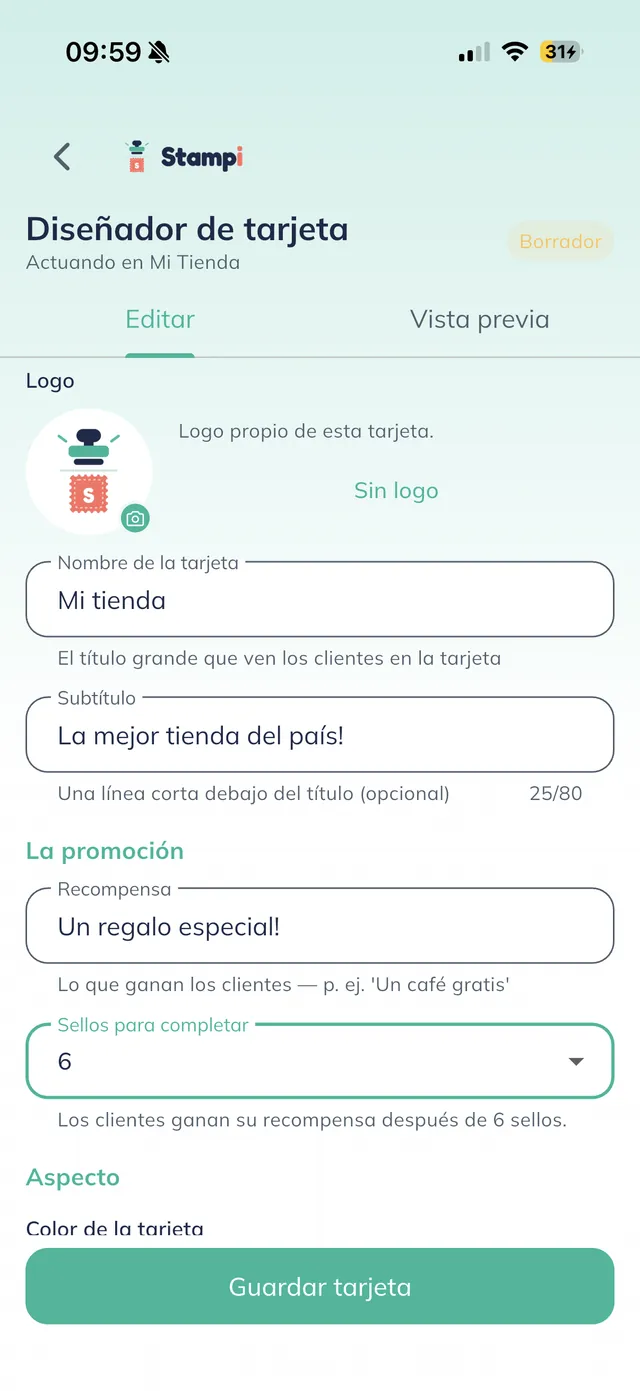
Set the name and reward
Fill in your card identity: "Nombre de la tarjeta" (card name, the big title customers see) and "Subtítulo" (subtitle, an optional one-liner). In the separate "La promoción" (the promotion) section, set the "Recompensa" (reward) and the "Sellos para completar" (stamps to complete).
Note: The reward and stamp count live under "La promoción" (the promotion), separate from Identity. The stamp field accepts 3 to 10. And remember the earlier notice: after launch, raising or lowering this number only affects new cards.
Choose color and icon
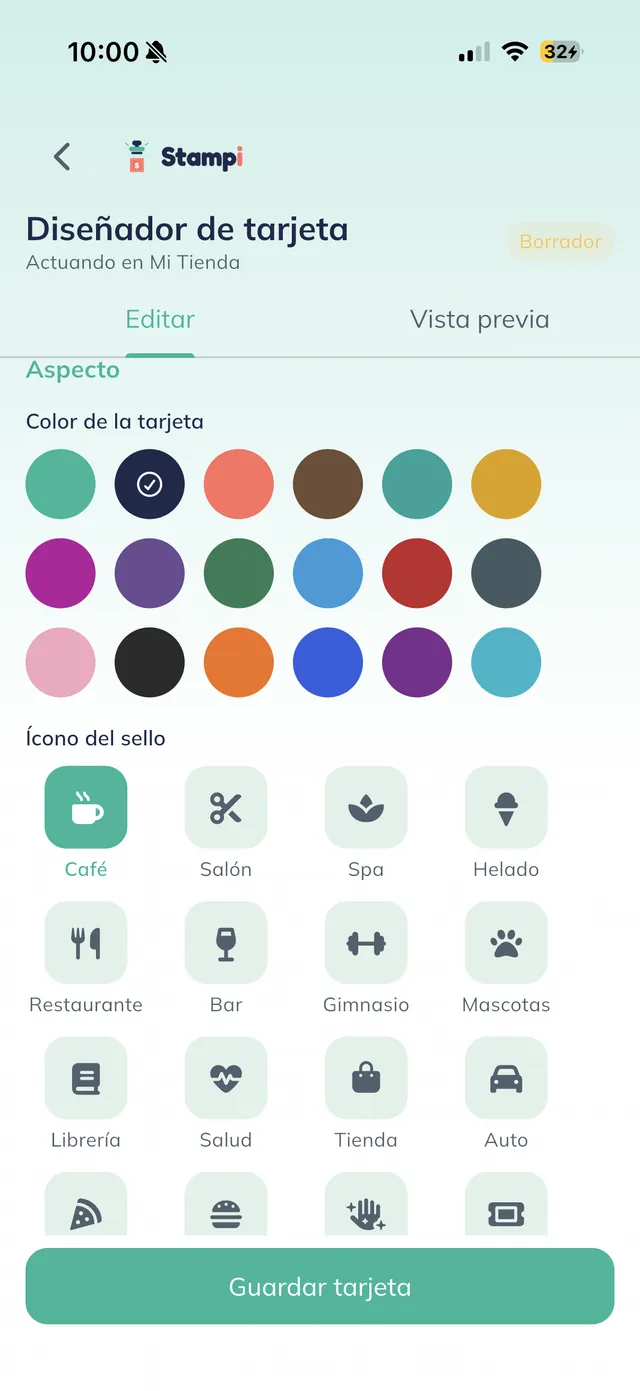
In "Aspecto" (appearance) pick the "Color de la tarjeta" (card color) from a fixed palette and the "Ícono del sello" (stamp icon) from a large grid: Café, Salón, Spa, Helado, Restaurante, Bar, Gimnasio, Mascotas, and many more as you scroll. Pick the one closest to your business.
Note: The colors are a fixed palette and the icons a curated grid: there is no free color picker and no way to upload your own icon. If none fit, ask the Stampi team: we add a custom icon to your grid on our side and it appears without you needing an app update.
Add details and renewal
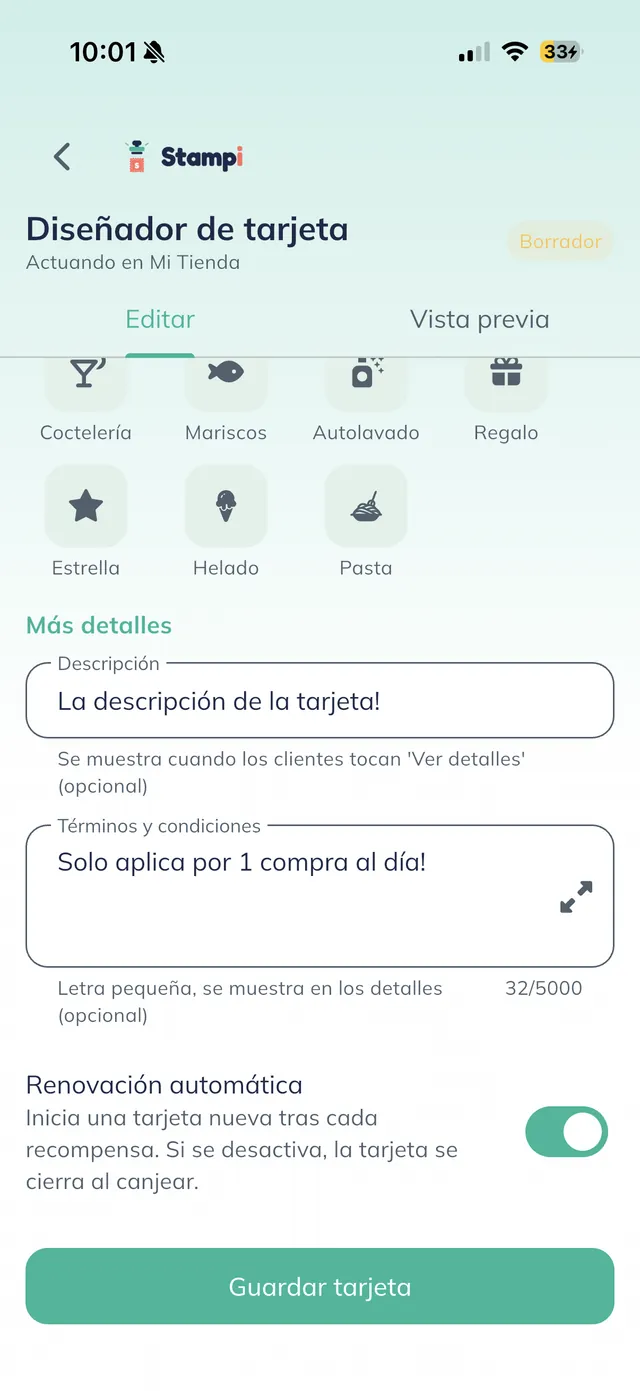
In "Más detalles" (more details) you can fill the "Descripción" (description, shown when customers tap "Ver detalles"), the "Términos y condiciones" (terms and conditions, the fine print), and the "Renovación automática" (auto-renew) toggle, which starts a fresh card after each reward.
Note: With auto-renew on (the default), when a customer redeems their reward a new card starts and they keep collecting. Off, the card closes on redemption and they would have to join again. Most stamp-card programs want it on.
Save your card
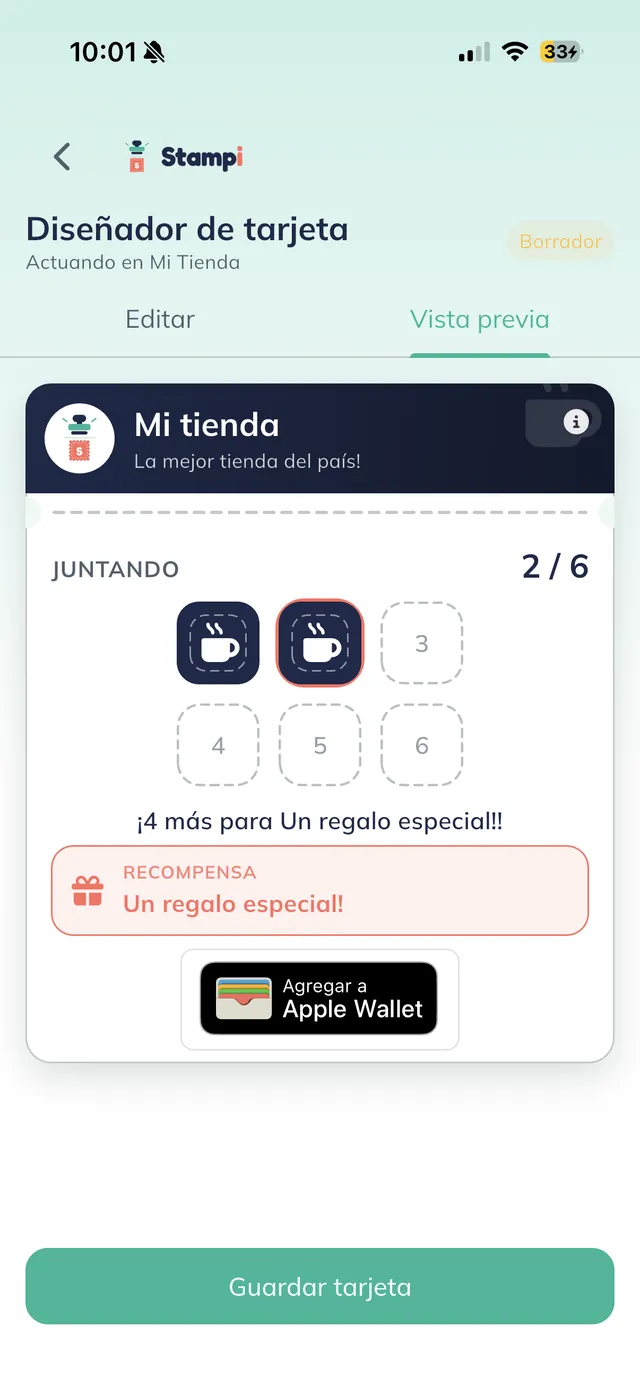
The "Vista previa" (preview) tab shows the finished card exactly as your customer sees it: logo, title, sample progress, the stamps, the reward message, and "Agregar a Apple Wallet" (add to Apple Wallet). Tap "Guardar tarjeta" (save card) to activate it.
Tip: This is the moment stamping becomes possible. When you save, the badge flips from "Borrador" (draft) to active and you can give stamps immediately, even if you have not finished steps 2 through 4.
Review the card details
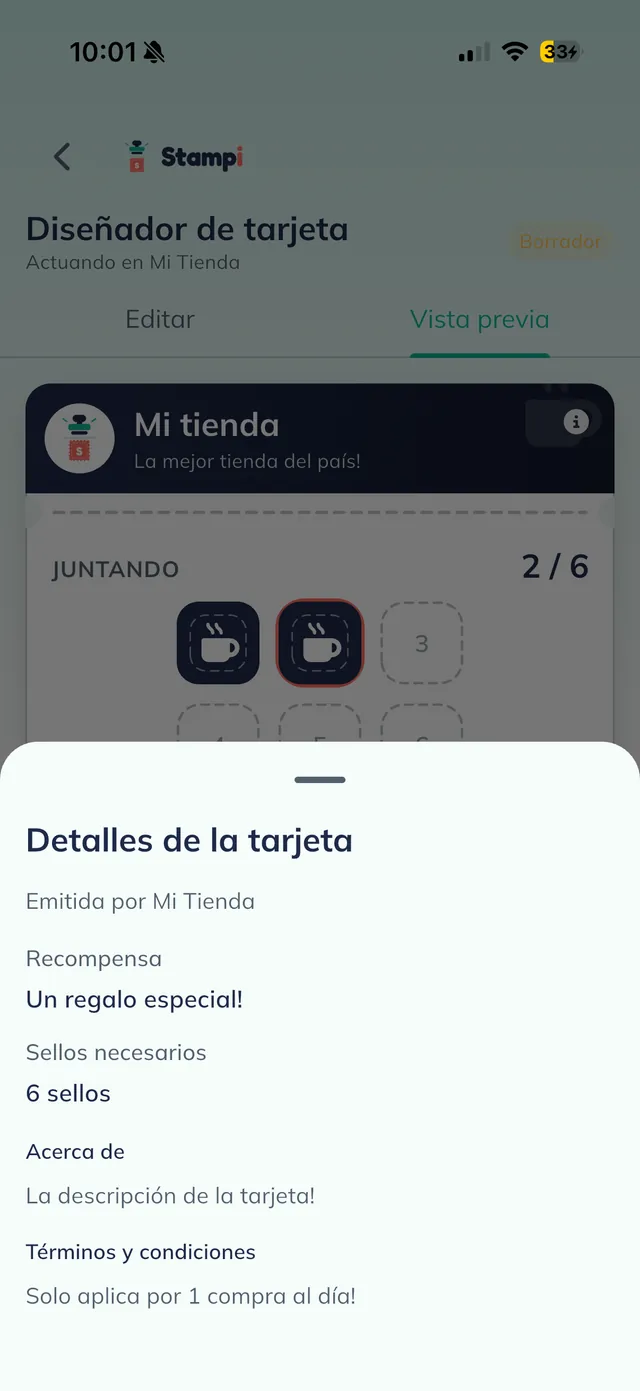
Tapping the info control (i) on the card opens "Detalles de la tarjeta" (card details) with the business, reward, stamps needed, description, and terms: the same sheet your customers can open. This completes step 1.
See step 1 completed
Back on your "Mostrador", the checklist reads "1 de 4 pasos" (1 of 4 steps) with "Diseña tu tarjeta" (design your card) ticked. From here you can already start stamping; you do not have to finish steps 2 through 4 first.
Add your location
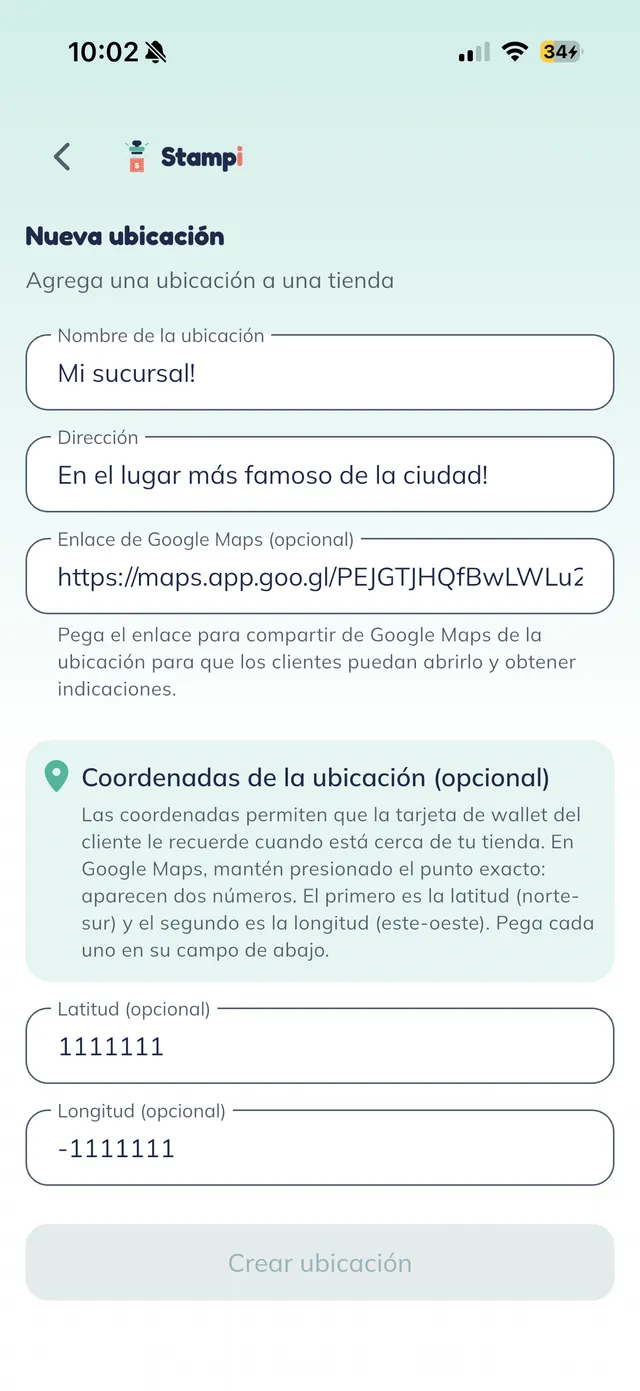
In "Nueva ubicación · Agrega una ubicación a una tienda" (new location, add a location to a shop) fill the required fields: "Nombre de la ubicación" (location name) and "Dirección" (address). Two optional fields add value before you tap "Crear ubicación" (create location):
- The "Enlace de Google Maps" (Google Maps link): lets customers open directions.
- The "Coordenadas de la ubicación" (location coordinates, Latitud and Longitud): power a reminder in the customer’s wallet.
Note: The coordinates really do power a Wallet reminder. When you fill in latitude and longitude, the customer’s Apple Wallet or Google Wallet pass gets a location alert: as they pass near your store, the card surfaces on their screen nudging them to come in for a stamp. It is a real feature, well worth using.
See step 2 completed
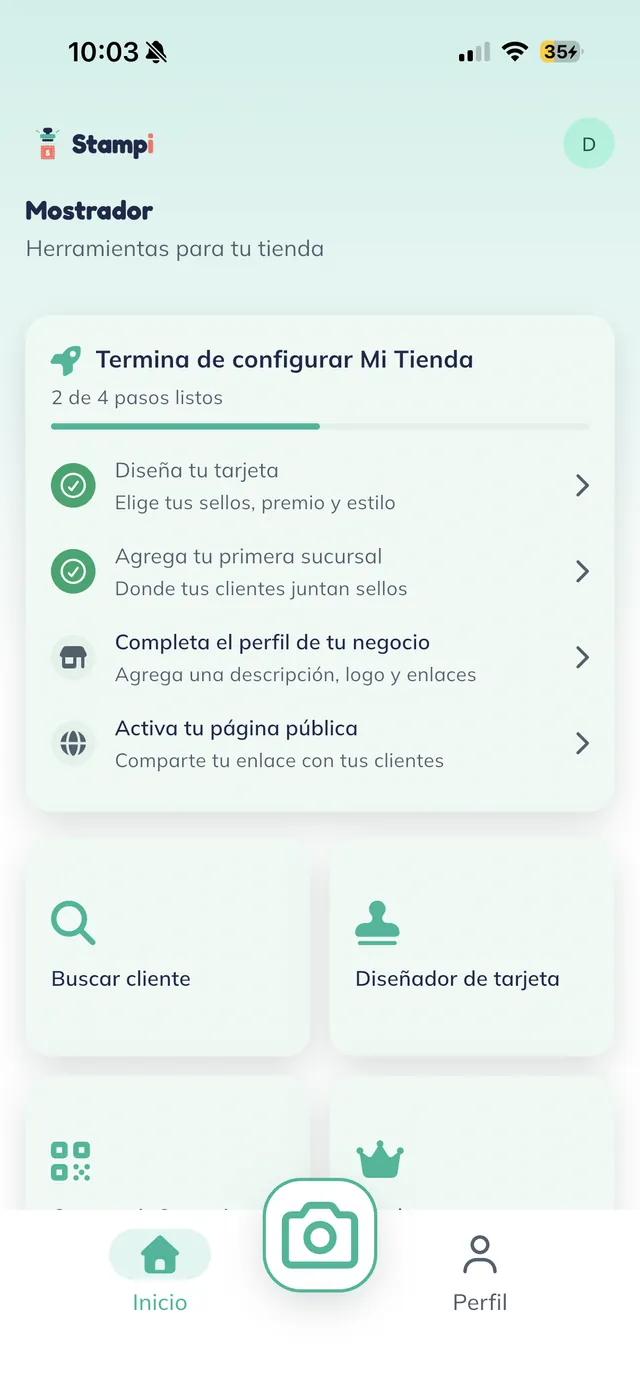
Your "Mostrador" advances to "2 de 4 pasos" (2 of 4 steps) with the location ticked.
Open your business profile
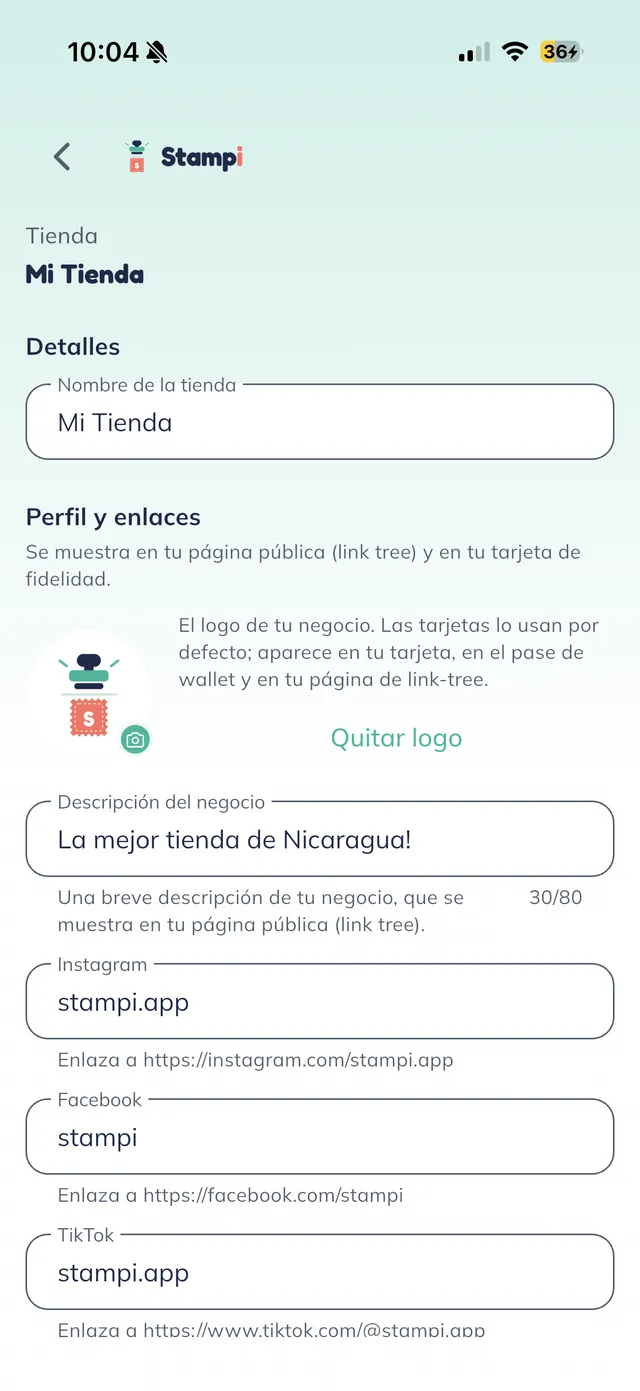
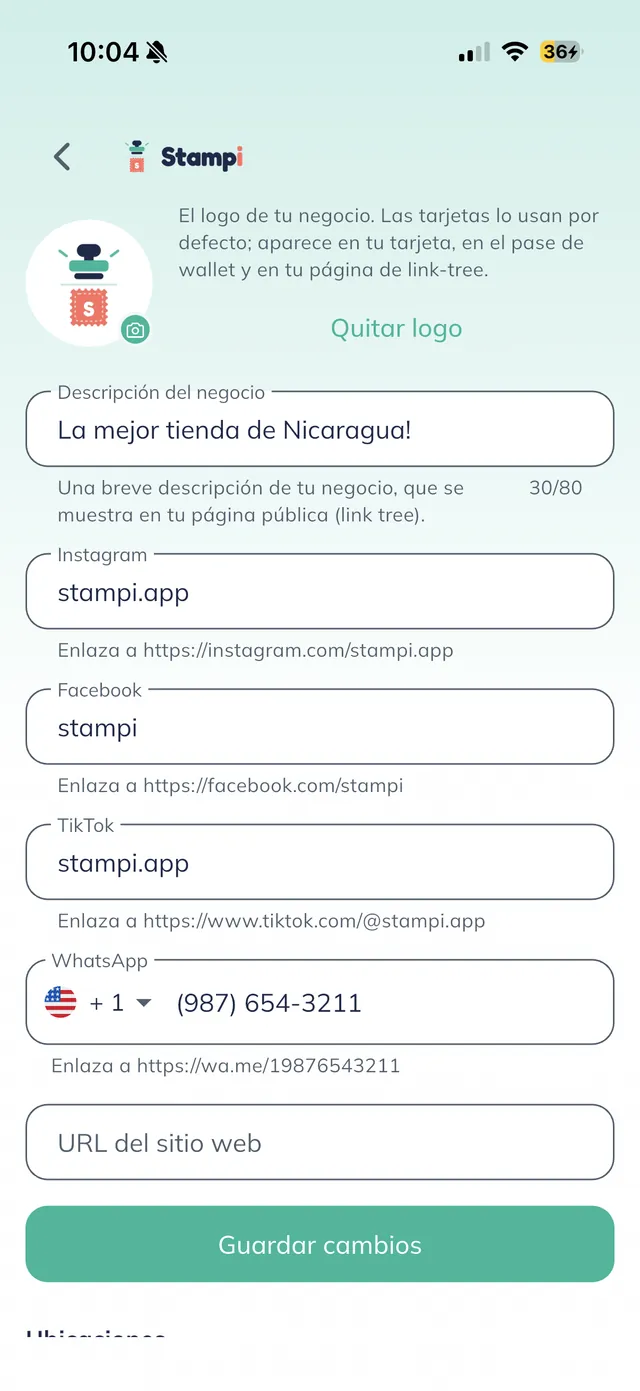
Your business profile opens with the name and logo, and "Perfil y enlaces" (profile and links) begins: this content appears on your public page and on your card.
Complete profile and links
In the links section fill the "Descripción" (description, a short subtitle, up to 80 characters) and your channels: "Instagram", "Facebook", "TikTok", "WhatsApp", and your website. Fill what applies and tap "Guardar cambios" (save changes).
Tip: The logo you set here is the one every card inherits by default, and the description is the subtitle shown on your public page. It is worth getting both right.
See step 3 completed
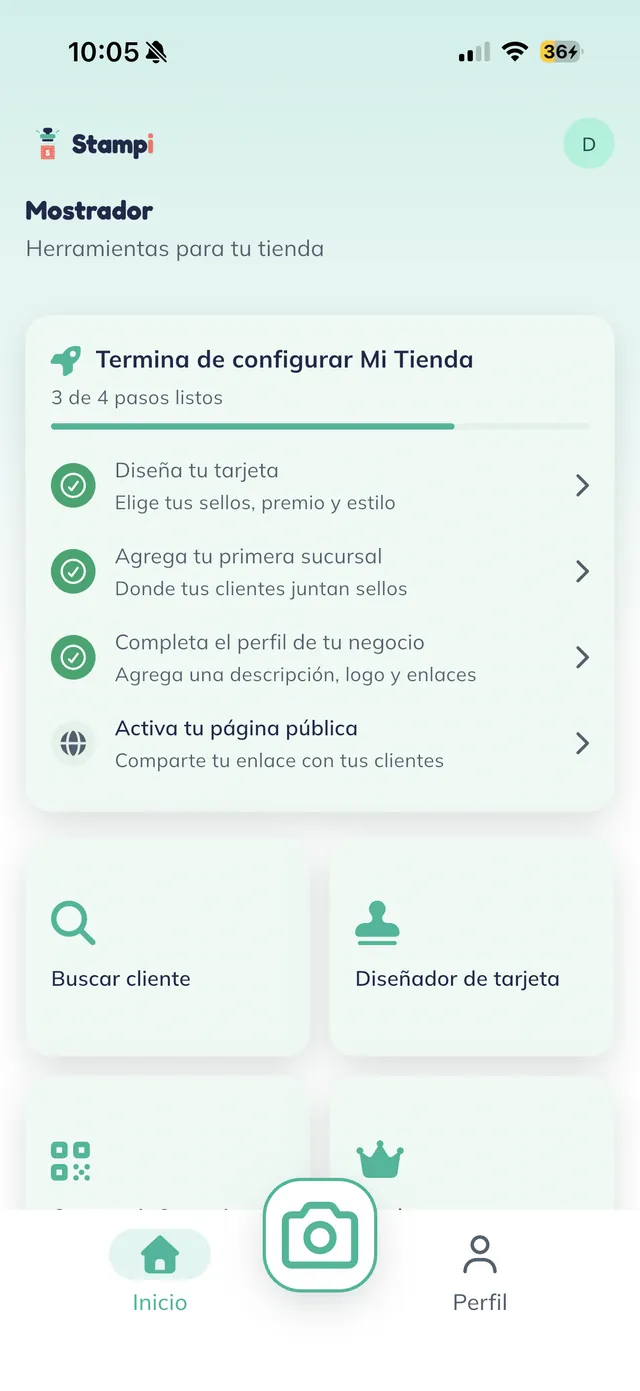
Your "Mostrador" advances to "3 de 4 pasos" (3 of 4 steps) with the profile ticked.
Activate your public page
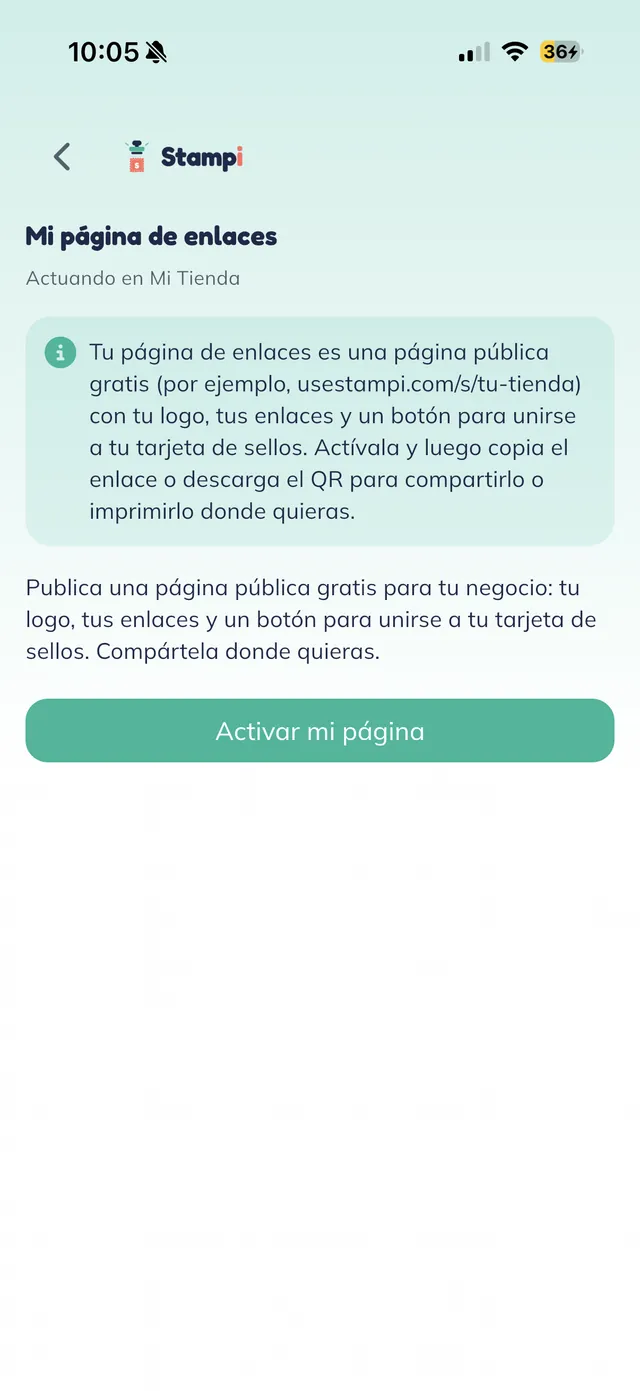
In "Mi página de enlaces" (my links page) you are offered a free public page, link-tree style, with your logo, your links, and a button for customers to join your stamp card. Tap "Activar mi página" (activate my page).
Copy your link and QR
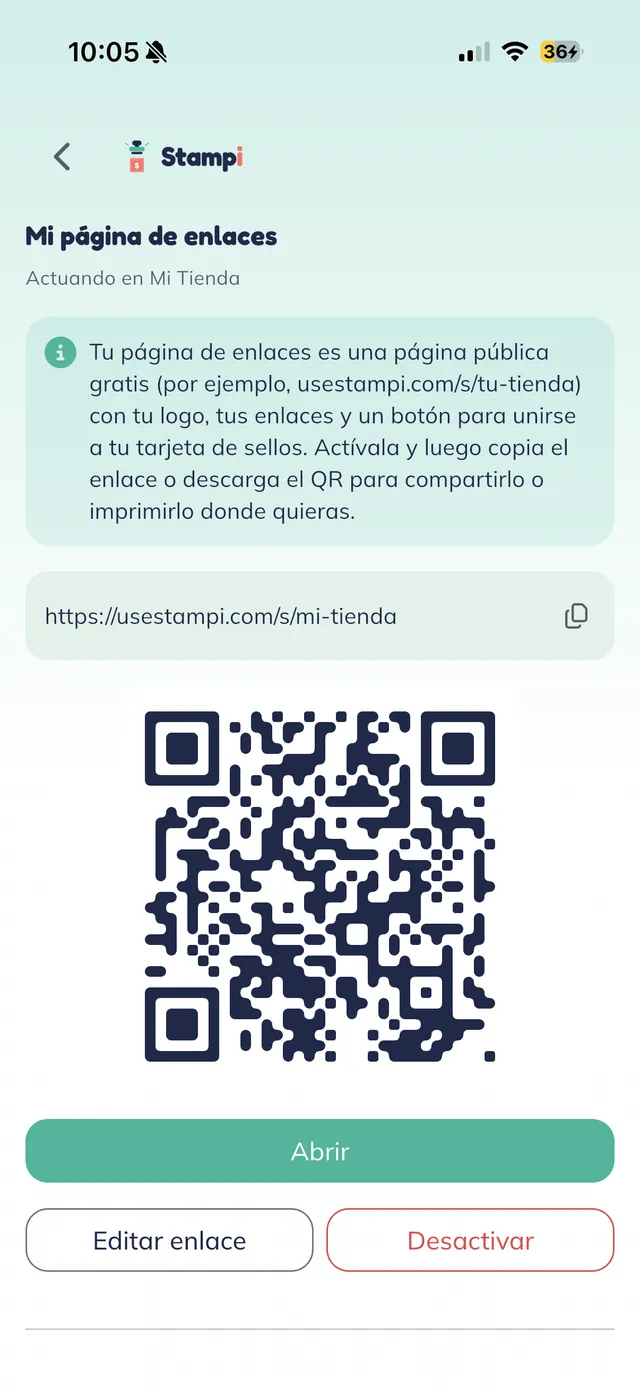
The page goes live with its own URL (like usestampi.com/s/mi-tienda), a button to copy it, a QR code, and the "Abrir" (open), "Editar enlace" (edit link), and "Desactivar" (deactivate) options.
Note: The app shows the page QR so you can screenshot or print it; there is no separate download button, you capture it from this screen. "Desactivar" (deactivate) turns the page off but keeps your link reserved, so if you re-activate later you reuse the same URL and the QR you already printed still works.
Choose your link carefully
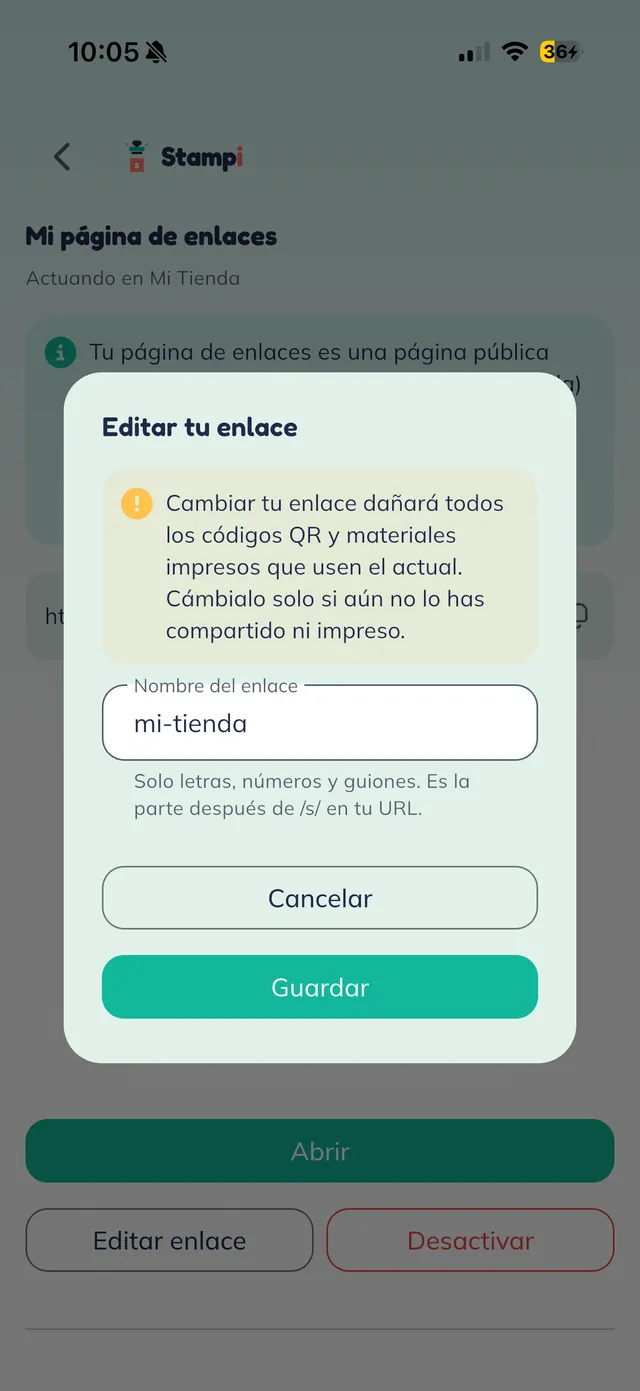
The "Editar tu enlace" (edit your link) dialog opens with a warning: changing your link will break every QR code and printed material that uses the current one. The "Nombre del enlace" (link name) field is the part after "/s/" (letters, numbers, and hyphens only, 3 to 40 characters).
Warning: This warning is real: your link is printed into every QR and flyer. Choose it once, before you share anything; changing it later silently breaks all printed material pointing at the old link.
See your page live
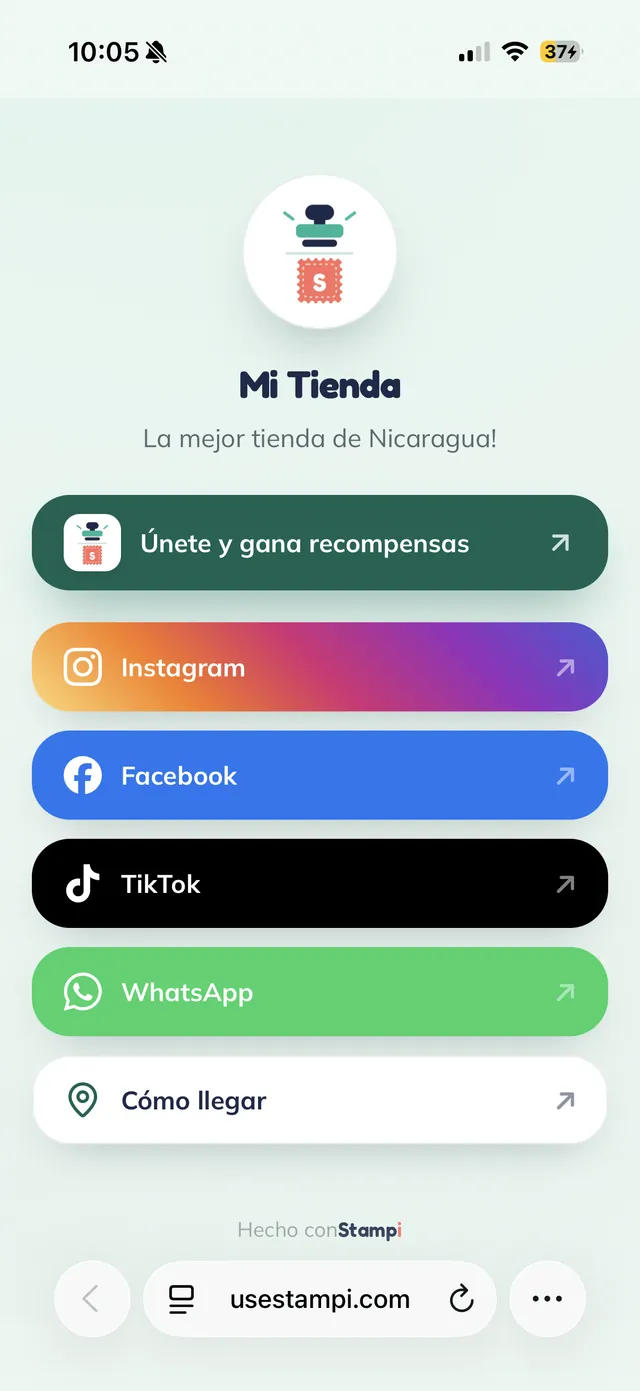
This is your public page exactly as your customers see it in the browser: your logo, your business name, an "Únete y gana recompensas" (join and earn rewards) button, and your links. End of the flow: your business is fully set up.
More tutorials
See all tutorialsStill have a question?
Message us on WhatsApp and we will walk you through getting your business ready, step by step.
Message us on WhatsApp